
Week 5! We are in the home stretch of the One Room Challenge™, and we are getting stuff done. Right now, my entire focus is on the details. I took one last run to Lowe’s yesterday, and we will finish painting over the weekend. As usual, I am meeting this project in the middle by working backward and decorating before all of the painting is done. After two years of living in and renovating BHH, I have finally figured out that I have to mix up the workflow, or I burn out. This process looks scattered to the outside eye, but the method keeps us on track.
***
Let’s talk about those details.
If you are just joining us today, feel free to read more about our project here:
Week 1 :: Week 2 :: Week 3 :: Week 4
Also, this post does contain affiliate links. Please read our entire disclosure if you have questions or concerns.
Plants
I am still working on thrifty ways to improve the look of the pots for our plants. I have some ideas that may or may not happen depending on time. So far, I have sprayed a gold rim around a white pot from IKEA. Whoopee. I popped a little fern in it which you will see in next week’s reveal post.

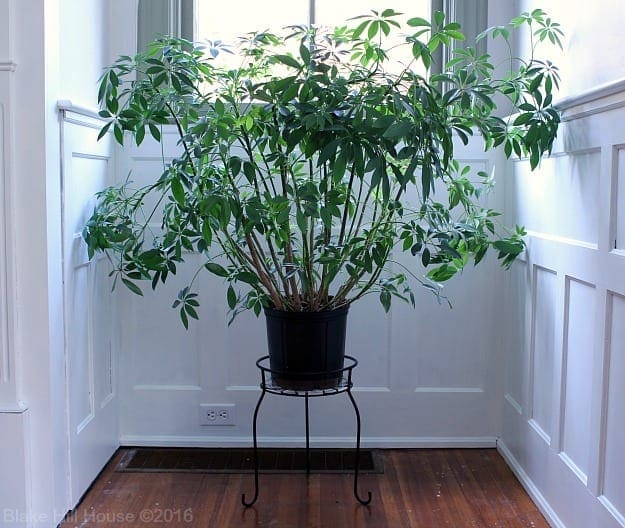
I have not actually done anything to the Schefflera pots themselves, but I did buy two plant stands from Lowe’s. These giant plants previously set on the floor.
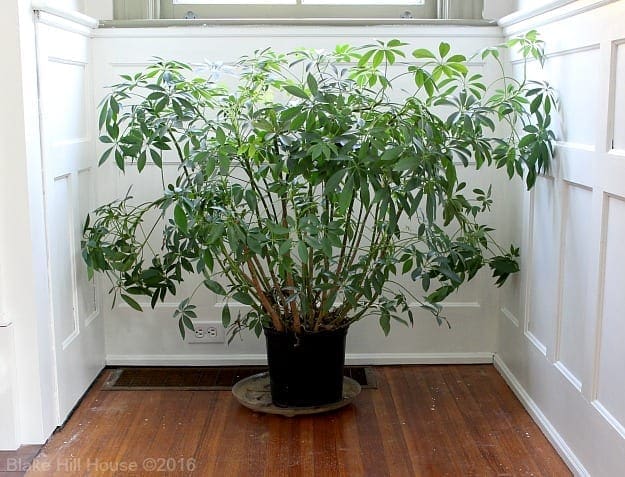
Now that I see what they look like on the plant stands, I realize that they look pretty silly in those small pots. I will do what I can during this challenge, but re-potting them in something more appropriate will have to wait until next spring. As usual, I struggle with scale when it comes to decorating. At least they are easier to water now.
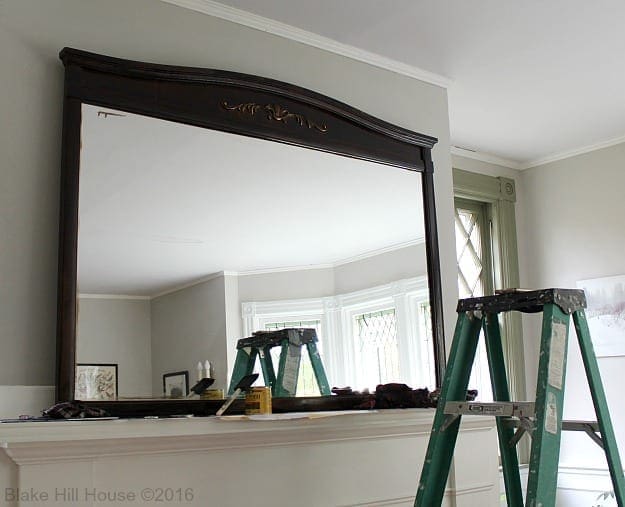
The Mirror
The mirror was a great find. One day, last winter, I was driving somewhere, and I saw this beauty on the side of the road. (Please excuse the old Instagram photo.)
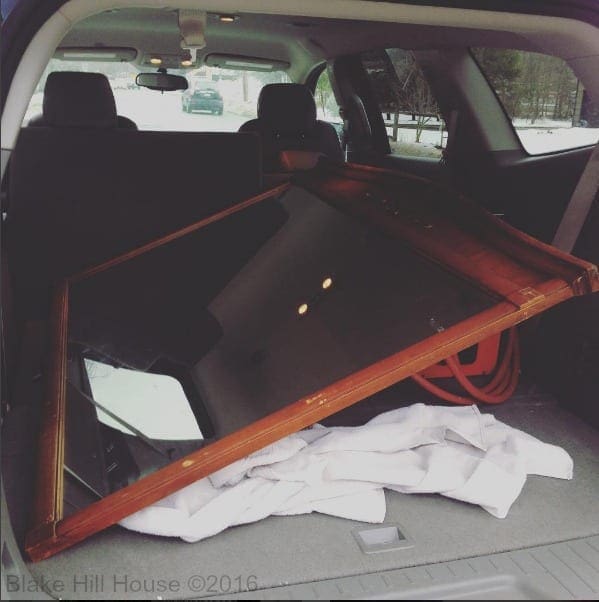
It is an old dresser mirror, and heavy as lead. Initially, it would not fit in the back of my Traverse, but after I stomp-kicked the metal brackets off, I was able to wrestle it into the cargo space. The original plan was to use it in M’s room, but we did not know how to hang such a heavy beast without ruining the plaster. It sat in the living room for ten months. Once we let go of the idea of using it in the bedroom, I knew that it would look great over the dining room fireplace.
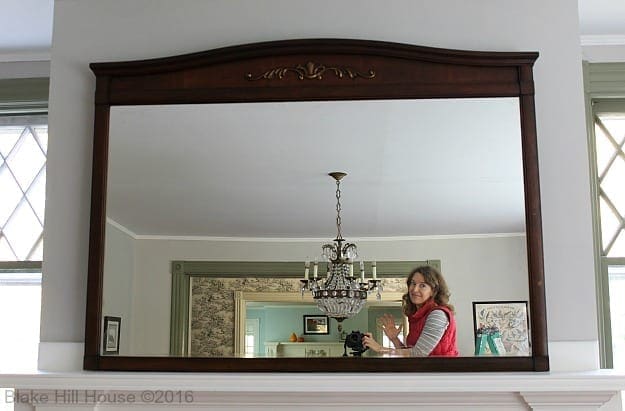
Andy used an 18″ metal cleat which holds 200 lbs. On the day of our party two weeks ago, Andy and the boys hefted the mirror up on the mantel and secured it with the cleat. The size of the mirror was just right, but the honey color screamed saloon vs. sophistication. Once the party was over, I grabbed some dark walnut stain and went to work. I was super lazy about it too. I scrubbed the mirror with TSP substitute, but that was it. When I work on free stuff, I tend to be pretty laissez-faire. Easy come, easy go.

I slapped two layers of stain on everything including the gold accent.
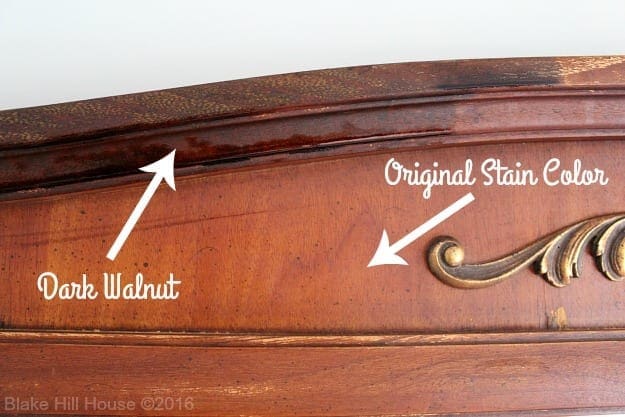
Fortunately, my apathy did not hinder the results. The walnut stain made a positive change. The new finish is dark and fresh.
Getting an after photo turned into a series of accidental selfies. The struggle is real with photography. Look past me and see how neat that reflection of all the rooms together looks. I would love to say that I set up the shot like this on purpose, but it was just serendipity.
Photos
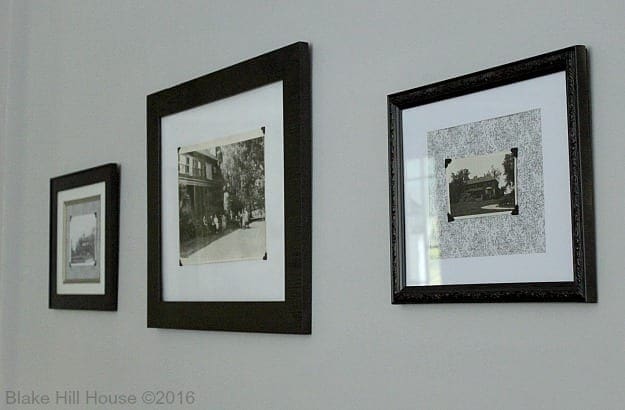
When we bought Blake Hill House, it came with something really wonderful: Old photos of the house. The dining room needed art. The pictures needed a place to hang. It was a match made in heaven.
I used oil-rubbed bronze spray paint to create a cohesive look with our thrift-shop frames.

After the spray paint dried, I mounted the photos on plain and paper-covered foam core with sticky black photo corners. I used the original frame mats when possible.
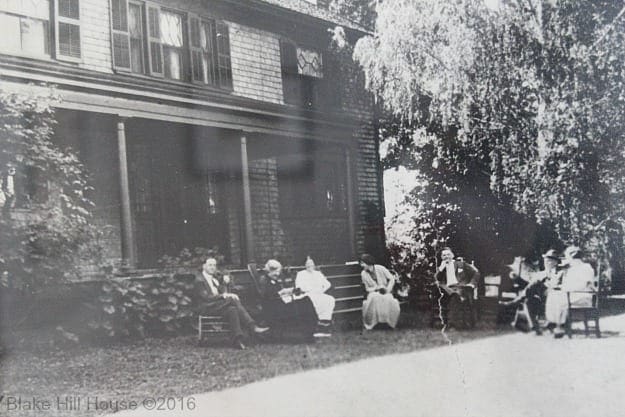
It is really fun looking at the house in its original state, and having the images is such a gift. In the future, I will devote an entire post to these photos so you can all get a good look, and we can analyze them together. BHH has had some facelifts over the years. For now, take a peek at this close-up. It is amazing! The man in the center, looking directly into the camera resembles Anthony Hopkins dressed up as an old-timey character.
The $10 Dresser
A few weeks ago, I posted a picture of this $10 dresser on Instagram. It was actually not the first piece I found. There was a genuine antique dresser (circa 1930) at the same shop, but someone snapped it up just before I could. They paid $20 for it. I nearly fainted, but c’est la vie. I have already forgotten what it looked like. This one needed a little TLC, but I love the black accents and the little skeleton keyholes on the top drawers. The $10 price tag was pretty sweet too.
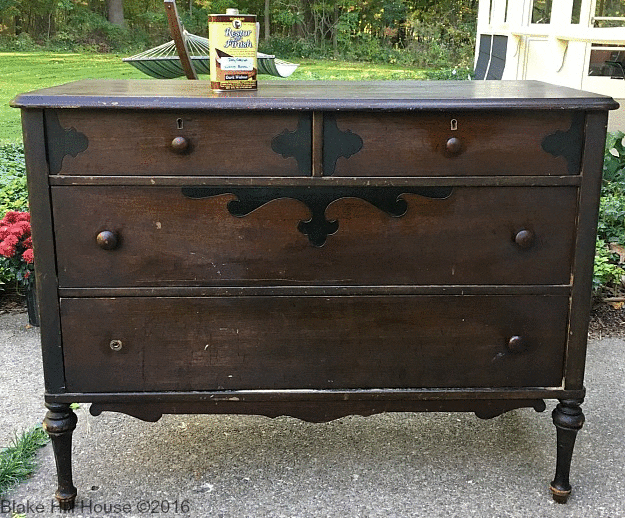
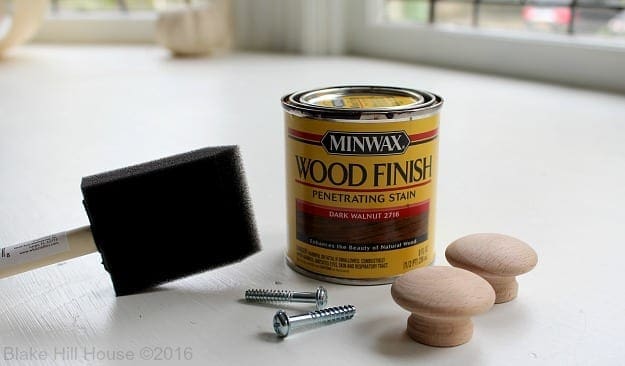
After giving the dresser a good scrub with mild dish soap and warm water, I turned to my go-to of Restor-A-Finish in dark walnut. The results were pretty remarkable, but some spots just needed more coverage. I used a bit of the Minwax dark walnut stain that we used on the mirror to touch up the legs and bare wood in the corners.
I used the same stain on new replacement knobs for the bottom drawer.
After three coats, the new knobs blend right in with the originals. I had a heck of a time getting proper lighting for the after photo so go easy on me. Hopefully, I will get a better photo for the reveal day post.
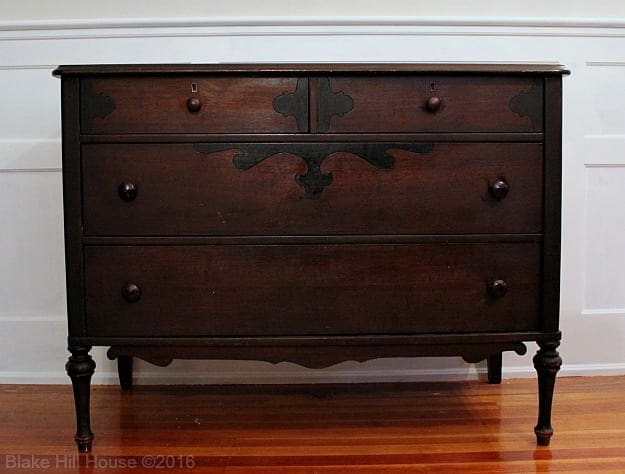
It isn’t perfect, but it is a great improvement. We like our antiques to be a little rough around the edges. Character rules around here. Our version of perfect is “good enough.”
I am starting to get really excited about next week’s big reveal. This thrifty renovation has been so much fun. Clearly, I have amnesia about all of the painting. When you get a chance, please make sure to catch up on the One Room Challenge™ projects of the featured designers and the other guest participants like us.
See you next week!


13 Comments
Ame Hughes
What an improvement on the mirror! It looked great already, but that dark stain makes it look fantastic. And the dresser! What a find!
My fave thing about this post is the old photos, though. What a treasure, indeed.
Stacy
It is so wonderful to have the pictures. They will stay with the house when we no longer live here. I hope future homeowners will enjoy them as much as we do. Thanks for the feedback on the mirror and the dresser. 🙂
Kristin @ Postbox Designs
What a great makeover! And I have to say, I love your wainscotting-that looks amazing! One more week to go, best of luck wrapping it all up!
Stacy
Thank you, Kristin. 🙂 Good luck to you too. This weekend is will be very full. I imagine it will be the same at your house. (I’m off to read your post!)
Courtney @ Foxwood Forest
Everything is looking great, but I’m especially loving that mirror!
Stacy
Thank you, Courtney! It can be hit or miss with these trash heap finds. 🙂
Jen @ Noting Grace
Stacy!! I’m sitting here agog! Seriously, that dresser is stunning! And those pics?! Shut the front door. This is gorgeous and I can’t wait to see the big final reveal next week. It has been a blast following along with you! One more week – we got this!
Stacy
Thank you, Jen. This whole thrifty project has been a series of fortunate events. It is nice to feel like we are swimming with the current instead of against it. 🙂 I have loved following your laundry room project too. Can’t wait to see it next week. (Next week!)
Christine
I’m really looking forward to your final reveal!
We live in a house built originally in 1855 and it’s been through lots of changes and we’re continuing to make more. I totally feel you on the “good enough.” Some things will just never be perfect but the house kind of demands some imperfect charm. We don’t live in a museum and a lot of our oldest pieces of furniture and art are family antiques that have been well-loved and used too.
Stacy
Thank you, Christine. I completely relate to your “We don’t live in a museum” comment. Amen to that! I would love to hear more about your house.
Christine
Stacy, we ended up buying the house we did in a bit of a rush after spending a whole summer under contract for a late-1800s duplex we planned to convert back to a single family. Our rental lease was up and we ended up with a bad appraisal making it almost impossible to buy the duplex and convert it under budget. A 3-bedroom, two-bath house popped up on the market, we went through it, and we submitted the offer that day. We live in a small college town in southwestern Ohio with a very limited real estate market that has gotten crazier the longer we’ve lived here.
Sometime in the mid 2000s, the previous owners did a remodel and updated bathrooms and the kitchen. They took out two fireplaces/wood burning stoves (can’t tell what was originally there) and made two full baths with the laundry in the downstairs bathroom. They did a pretty good job, but there’s a lot that could be done to better honor the house. It was originally built in 1855 and the front room (probably the one used for entertaining guests) was Greek-revival style moldings and trim. The original owner came from New Jersey and probably built the house himself when a number of parcels of land were sold off by one of the village’s biggest landholders. Coincidentally, in some digging done on the owner and his family, his second wife, who lived with him in this house, is from my maternal great-grandfather’s family. I joked to my husband that we can’t ever sell the house because it has good ancestor juju!
There’s a lot of Craftsman-era updates along with the mid-2000s remodel, so basically, my plan has been to do some consistent period lighting and electrical stuff (push button switches, brass plates on outlets), as well as replacing door knobs to match the remaining period ones and upgrading to brass floor vents. I’d like to have some consistency across the house as far as more historic finishes. Our furniture is kind of a mix of Ikea, mid-century finds, and family antiques. We’re making it work.
The kitchen has original 1940s uppers and lowers and a butler’s pantry area from the 2000s. The layout works well and there’s lots of space in the kitchen. We’ve been slowly repainting the cabinets and adding knobs and pulls. I’d like to replace our laminate counters with either butcher block or tiled counter tops and drop in a nice sink. But that’s way off in the future. I also need to repaint all of the trim in the house and something tells me I’ll get to that first before we ever get to the kitchen counters.
Mia
That mirror over the fireplace just adds so, so much to the room. Great find and refinishing!!
Stacy
Thank you so much, Mia!