Are we done yet? Yesterday, I was thinking about how my feelings change as the weeks of the One Room Challenge progress. After seven rounds, I am developing a pattern:
- One week before: I don’t know if I want to do this again.
- Week One: Let’s do this! I love everyone in this big, bright, beautiful world.
- Week Two: This is so awesome. I’m a week ahead of schedule! Maybe I’m the awesome one.
- Week Three: The paint color is wrong. I hate it. Everything is wrong. I am now behind schedule.
- Week Four: I fixed it. Now, I have exactly one week to build an entire room’s worth of furniture.
- Week Five: Amazon, take my money.
- Week Six: We did it! I love everyone in this big, bright, beautiful world.
Repeat in six months.

Fixing The Mural
Last week, I posted this picture of the mural, and I mentioned that I was not fond of the bottom two colors.

Before I started on the second wall, I made a new game plan. Based on some excellent feedback from Instagram, I cut the pallette down to seven colors instead of eight.
Then, I headed to the paint store for two new colors for the bottom.
For four hours, I did a little drawing, color swapping, and rearranging. When I stepped back to admire my masterpiece, it looked like…
…a pair of camouflage pants.

Instead of a bed, this room needed a hunting blind and some buck spray. What a mess!
Almost Back to the Drawing Board
At this point, I nearly sanded the whole thing off and painted the walls a solid color. Looking at the mural with a critical eye, I decided I still liked the top two colors and the fourth one down too. With more guidance from Instagram, I was determined to give the mural one more try. That meant another trip to the paint store.
This time, I chose three new colors. (What am I going to do with all of these leftovers?!)
Now is a great time to mention HANDy paint products. The company sent me several of their products to try for the One Room Challenge. I used the HANDy Paint Pail with disposable liners for each color. However, you know me; I didn’t throw them away. I will use them until they break.

When the latex paint is dry, it peels right off of the plastic liners, but peeling it off isn’t even necessary. Wet latex and dry latex won’t mix. I reuse paint tray liners like this all the time.

I am sure that photo is not what HANDy Paint Products had in mind for a product picture, but Millie is positive that this mural is only happening because she’s here to help.
One of my favorite features of the HANDy paint pail is the magnet on the side. It keeps the paintbrush from slipping down into the paint. Also, the handle on the back makes it much easier to maneuver than a quart can or a heavy gallon.

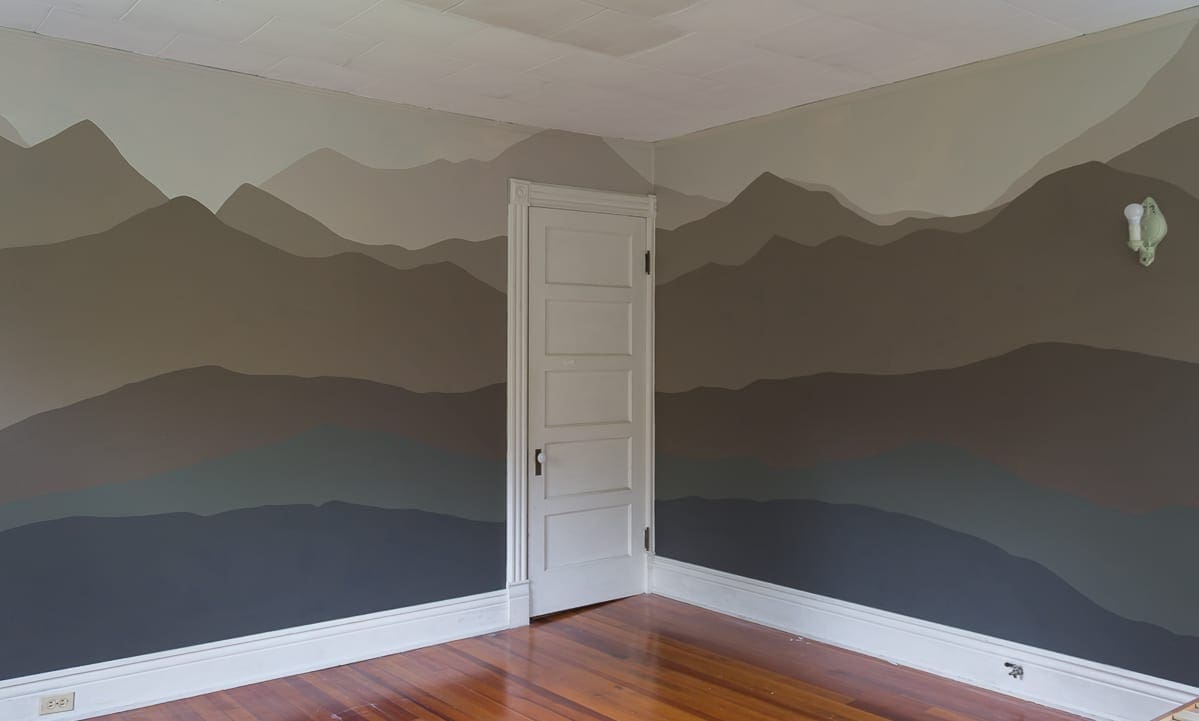
The Final Mural
After several more pre-dawn hours of work, I finished both mural walls, and they are very different from the original inspiration photo.

For the BHH mural, I redrew some of the mountains on the right side wall, and I abandoned the tree idea altogether. (Sorry!) Now, I have something I am very proud to share. Overall, it feels more sophisticated to me than the original plan.

Here’s what I did:
- Left the top two colors as-is
- The three new brown colors are from the same paint chip color row, but darker.
- Moved the middle color from the first and second attempt to the very bottom (It is now the darkest color on the wall.)
These new color choices created a happy accident too. When the light hits the brown shades, they look like they are glowing. It’s so neat! Can you see it? If you cannot, click on the image to see it full-sized.

Even though it is very different than the original, the basics are the same. I stuck pretty close to the rule of thirds, and the left and right sides are not too symmetrical or matchy-match.
Fifteen hours, eleven quarts of paint, and six paintbrushes later, a little piece of the California Sierras (home!) lives in BHH now. Without even realizing it, that was the image that I was channeling the entire time.
Next up, I’ve got one week to build a room’s worth of furniture. It looks like I am right on schedule, after all.
Are you following the One Room Challenge? If so, are there any projects from the guest participants or the featured designers that caught your eye? Please let me know in the comments.

Love it? Pin it!


26 Comments
Emily
I almost did a mountain mural, and my favorite tutorial used a quart of light paint and a quart of dark paint, and mixed those two colors as they went to get the graduated color scheme. I like where you landed, but I think if I ever do get brave enough to do one (and really? You already won when you were willing to just go for it!) I think I’ll use that approach. I can see how it would avoid some of the problems you encountered! Can’t wait to see the finished room!
Stacy
There are so many people out there smarter than I am. LOL Great idea with the two colors mixed. That’s exactly what the paint chip row is!
Vanessa
Nicely done Stacy
Stacy
Thank you, Vanessa!
Jen
Stacy I love the mural! You’re right the colors really glow (I could even tell from the tiny instagram image on my phone, so you know it’s true). Can’t wait to see what your builds look like!
Stacy
Thank you, Jen! The glowing colors were a happy accident. 🙂 Also, I loved this post on your blog: Moody Blues Bedroom – ORC Week 3 It was fascinating!
Monica
I think it looks great! Am looking forward to seeing it with furniture etc. It is going to be lovely!
Stacy
Thank you, Monica!
Jennifer
I really does look like the foothills and Sierra mountains! I love the colors you landed on. Can’t wait for weeks 5 & 6!
Stacy
Thank you! I’m starting to get excited again. 🙂
Aileen
Looks awesome!
Stacy
Thanks, Aileen!
Devyn
Looks Fantastic! You nailed it in the end.
Stacy
Thank you, Devyn. 🙂
Downraspberrylane
I’m pretty stoked about this room. And so admiring how you didn’t give up on it, You’re so badass.
Stacy
Thank you so much! I’m not a giver-upper. 🙂
Sherrill
What a great result. It excites my sensibilities because I am also a displaced Californian who used to spend part of each year at Lake Tahoe. Now I am in Oregon, birthplace of Pendleton, whose products I have always admired. (Did you know that the company was started by a woman?)
Stacy
We have so much in common, Sherrill. Oregon is one of my favorite places. Also, I did not know that a woman started Pendleton. That’s wonderful! I’ll have to take a look at its history. Thanks for the tip!
Miss-Apple37
As said previously on IG, the end result just looks amazing!! So looking forward to seeing this room furnished!
So how did you correct the previous version, you sanded and painted another color on top of the previous one? Sorry I’m not sure I read or understood that right. The first version was in the shades of blue and grey and now they’re more in the browns. Very well done!
Stacy
Thank you! 🙂 I never did any sanding. I just repainted over the old colors. When I changed the shape of some of the mountains, I actually did that while I was painting. I didn’t bother to redraw the shapes with a pencil. I’m sorry that was unclear.
Jess
I feel that ORC pattern with every fiber of my being haha. The mural turned out so beautiful! I can’t wait to see everything all put together.
Stacy
Haha! Your kitchen, pantry, dining room project is looking so good, though!
Jenny
Very nice results! I sympathize with your color woes, but the end result looks great.
I LOVE those Handy paint pails! We bought them a few years ago when we bought our house. We knew we were going to be painting every room in the house plus the ceilings, and it really did make it all so much easier–the magnet on the inside is genius and made climbing up and down ladders with paint pail + brush much easier.
Stacy
Thank you, Jenny. I am also happy to read your feedback about HANDy paint pails. I genuinely believe in this product, but I know some readers may have concerns about my sincerity because I received the products for free.
Honestly, though, I cannot believe how much easier it is to get up and down off a ladder. I’m terrible about trying to take work shortcuts, but using a Handy paint pail is worth the extra step of pouring the paint into a liner instead of painting straight from the bucket.
tim@designmaze
OMG this is incredible!!! so beautiful and so much work! glad that it worked out and I want it in my own home!!
Stacy
Thank you so much, Tim! I live close. I can come paint one for you! 😀