We are still heavy into the last couple of days of the guest room refresh, and the One Room Challenge™ starts on Wednesday, but today, I am starting a series of posts about DIY Basics. Nearly three years ago, when I started this blog, we had very few skills to share. We had a whole lot of self-confidence, and that was pretty much it. Now that we have been up to our eyeballs in everything from bookshelf building to window pane replacement, I finally feel qualified to create our collection of basic DIY tips and tricks. Today’s post, the first in this series, is all about using an oil-based primer.
Why Oil-Based Primer?
Although latex primer is readily available and easier to use, we use oil-based because our woodwork is painted with oil-based paint. It is fine to use latex paint over oil-based paint, but you must use an oil-based primer before you do. This is such an important DIY note that I am going to repeat it in bold and italicized text:
Before you cover an oil-based paint with latex paint, you MUST use an oil-based primer.
You might ask yourself, What will happen if I do not? Let me show you.
Exhibit A:
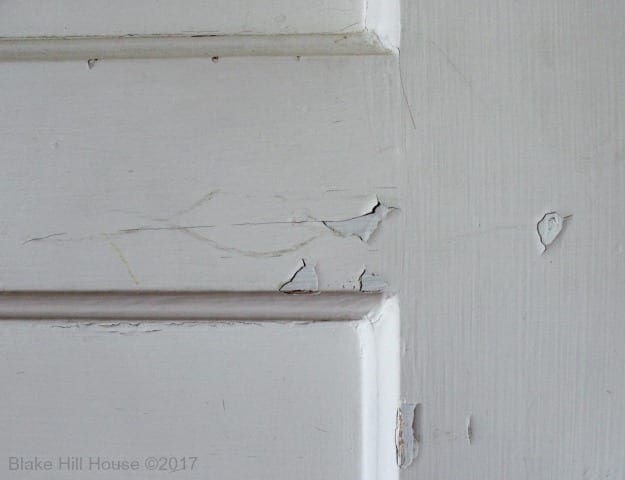
Exhibit B
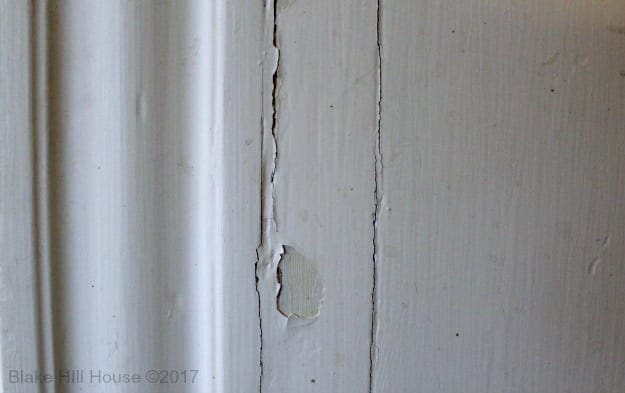
Without proper primer, the latex paint on top of the oil-based bubbles, cracks, and chips off because it does not adhere properly. You might also wonder, Can’t I just use a latex primer? Primer is primer, right?
The answer is an unequivocal NO. Now, I don’t mean to be shouty and go all caps on you, but this is just one of those hard and fast DIY rules. Trust me; you will thank yourself for being a rule follower.
All of this leads me to predict your last question: How do I know if the paint I am painting over is latex or oil-based?
I am glad you asked. There is a simple test you can do. Soak a cotton ball in alcohol or nail polish remover and rub it on the paint in question. If paint rubs off on the cotton ball, it is latex paint. If it does not, it is oil-based.
One more important note: Before you begin, make sure your project is clean and free of loose paint. If you suspect lead paint, STOP and perform a lead test first. If your project tests positive, follow proper lead-paint protocol or call a professional abatement company before you do anything such as sanding that will introduce lead dust into the air or track it through the house.
This post contains affiliate links
Using Oil-Based Primer – The Six Simple Steps
Now that you know you need an oil-based primer, let’s get to the heart of this post. If you follow these six simple steps, your woodwork will be perfectly prepped for the paint of your choice.
1. Stir, stir, and stir some more.
Use a traditional wooden stir stick to mix the pigment and the oil together. These two things separate every time the primer sets on the shelf unused. Just when you think everything is mixed, stir it a bit longer. Keep your stir stick handy, so you can mix the primer as you are using it.
2. Pour the primer into a new container.
Pouring the primer into a new container is an important and oft-skipped step. Pour a small amount into a separate container such as a large yogurt tub or a plastic cup. This will become your working container. Place the lid back on the original paint can. If you choose to work directly from the paint can itself, tiny blobs (technical term) of dried primer will scrape from the brush back into the can and incorporate into the mix. The blobs will either adhere to the woodwork or create drag marks in the wet primer on your project.
3. Thin with Mineral Spirits if necessary.
Often, the last third of the primer in the can gets a little too thick to work with easily. While the consistency of primer is slightly different than paint, you should be able to make smooth strokes with an oil-based primer, and the brush stroke marks should fade a little as the primer dries. If the primer is too difficult to smooth with your paintbrush, thin it slightly with mineral spirits. There is no particular ratio of mineral spirits to primer, but start conservatively. (think teaspoons) The goal is to decrease drag marks from the brush and make the primer easier to use. If it is too thin, it will drip and sag on your project.
4. Use a good-quality bristle brush
Now is not the time to cheap out and try a sponge brush. Invest in a good-quality bristle brush labeled for oil-based products. Purdy and Wooster make excellent paintbrushes. I have also had great luck with store brand brushes from various local hardware chains. When you use a high-quality paintbrush, the oil-based primer is easier to spread with long, even strokes.
5. Don’t look back.
Be like the Bob Dylan documentary, Don’t look back. Work forward. Use long, even strokes with the brush, and avoid the temptation to touch your brush to anything that has been drying for longer than about a minute. Oil-based primer is stickier than latex primer, and that tackiness remains for hours until the oil-based primer dries. When you drag your brush across oil-based primer that is drying, the brush will leave marks and rough up your smooth surface. The only fix will be to wait until it is completely dry and then use a sanding sponge aggressively to make the surface smooth again.
6. Sand gently when dry

When the oil-based primer is completely dry, the surface may still have a few small imperfections. This is typical even if you are a pro. The surface may feel chalky or even slightly rough. Using a Sanding Sponge, lightly sand the entire surface. Be gentle! The goal is to remove the imperfections, not the primer itself. After you sand, the surface should feel smooth. Vacuum and wipe with a damp rag.
Once you follow these six simple steps for using oil-based primer, your project will be properly prepped for your favorite paint.
Did you know that Blake Hill House is active on Pinterest? If this post is helpful, please share it and pin it for later. We would also love to hear your tips and tricks for oil-based primer so feel free to leave a comment.


15 Comments
Ame Jo
I’ve been avoiding painting certain things in my house due to this very issue. I’ve gotten over my irrational fear of using oil-based primer (I paint on canvas with oils, for cripe’s sake!), but the taking hours to dry thing is going to mean that my people need to not be here when I take the plunge. Hmmm, maybe I’ll send them all on vacation again this year while I stay here and do home improvement in blissful silence. ?
Totally book marking this post for future reference!
Stacy
I am glad it will be useful to you in the future.
mkcubed (formerly harper)
Will you share about the clean up of using oil-based products? That is what keeps me from using them. I’m fearful of the risk.
Stacy
I’ll work on a full post, but the short version is that I use mineral spirits and wear gloves.
Kalila
Very educational post. I never knew how to tell if you had oil based paint or latex. Thanks for the helpful info.
Stacy
You’re welcome, Kalila. I am glad it was helpful.
Walt
My son-in-law and I will be starting a project soon using oil base primer. We will implement the tips you offered in your blog, I hope all goes well.
I will let you know how it turns out.
Stacy
Hi Walt, I hope the primer tips helped! I look forward to hearing how it goes.
Matt
So if we shouldn’t go back over recently-covered areas until it’s dry, should we wait in between cutting and rolling?
Stacy
Hi Matt,
I am so sorry that I missed this comment before today. Unfortunately, I never got a notification from the blog–my mistake. Hopefully, my reply is not too late. The main message regarding going back over recently-covered areas is to avoid overworking the oil primer because it will show a brush mark texture. So, if there are two of you working, one person could cut in, and another could immediately follow behind with the roller.
I roll as close to the woodwork as possible instead and have the follow-up person spread the roller edge paint to the woodwork with the brush–cutting in. If you’re working alone, go ahead and cut in first. Then, knock down the edge with a sanding sponge before you roll the oil primer onto the walls. Honestly, I always give oil primer a light sanding with a sponge, even on walls. It’s an easy thing to do, and it makes the surface baby smooth for paint.
Dan
This post/blog whatever it is, was very helpfull to me when using this oil based primer. The thoughtful ideas were great and I will definitely keep in mind from my next project and any thereafter.
Thank you so much: DAN
Stacy
Thank you for the feedback, Dan. I’m glad the blog post helped.
JohnH
How do I know when my oil based primer is dry enough to sand?
Stacy
Hi John, Always take a peek at the recommended drying time on the side of the can because paint companies reformulate their products with some regularity. I usually sand and paint the next day (12+ hours) because I rarely have time to finish a project in one day.