Alternate Title: Sanding Hardwood Floors | You Can DIY This!
Second Alternate Title: I Believe in You!
I began talking about our large floor refinishing project at the end of January. Almost everyone asked the same question, “Are you sanding the hardwood floors yourself?” My response was always, “absolutely.”
I need to clarify that I never had any intention of doing this all by myself. This was a project for Team Andy & Stacy, not just me. We knew that to get this done promptly, we would need to work together. However, I started to think about Team Andy & Stacy’s collective weaknesses, and I strongly considered calling in the professionals to do the sanding and limiting our involvement to finishing the floors. When I mentioned
Be warned that this is a super meaty post. The first half is about our method. The second half, where I talk in-depth about the different types of sanding machines, is more technical.

This post contains affiliate links.
Sanding Hardwood Floors – Our Process
Special Note: We are using Rubio Monocoat as the floor finish. It is a unique finish that does not create lap marks. That is why we can sand and stop where we did and refinish in two phases the way we have planned.
Although we are sanding the entire first floor, so far, we have only sanded 1/2 of it. In other words, we are in phase I. We moved the furniture from the dining room into the living room, and we scattered everything from the laundry room all over the house, explosion style. BHH looks like it has been ransacked. None of our possessions are sparking joy right now. I want to burn it all. Kidding. Not really.
Preparation
First, I removed all of the shoe moldings. While it was not entirely necessary, the edger sander gets pretty close, I wanted the most professional-looking job, and much of the shoe was broken or chipped. Only the shoe molding in the dining room was in salvageable shape, so I labeled it and set it aside. Typically, moving clockwise, I mark each piece with a room abbreviation and number them as I remove them in order.

After a lot of discussion with the guys at my favorite rental place, I rented a U-sand machine and an orbital edger. We had never used a U-sand before, but I had a lot of experience with the orbital edger. I chose the U-sand over a belt sander because it was gentler on the surface, and we wanted to avoid bump marks and lines. I used a belt sander in both the library and the kitchen, and there are some visible mistakes. (See below for more information on this topic.)
Our house is laid out like a traditional Colonial, and the living room, foyer, and dining room are open. That means that if we made any big mistakes, they would glare at us for eternity. Andy can live with that. I could, but it would bother me for a long time. Even though we are avid DIYers, I strive for professional-looking results. Also, I do not have a picture of how these rooms flow together, but there are individual pictures on the Winter Eclectic House Tour post if you want to take a look.
Sanding
While I organized our supplies, Andy started with the U-sand machine fitted with 20-grit sandpaper discs. We knew it would be slower going with the U-sand vs. the belt sander, but neither of us was prepared for the fact that this machine barely made a dent in the surface of the old polyurethane. Isn’t that the way it is with poly? It adheres when you want it to come off, and it flakes where you need it to say intact.
Sanding hardwood floors is always a grind (see what I did there?), but we cut our losses quickly. The U-sand sander was not the right tool for this part of the project. Andy and I decided that I would sand the entire dining room floor with the orbital edger and 20-grit sandpaper instead. Then, he would follow with the U-sand.
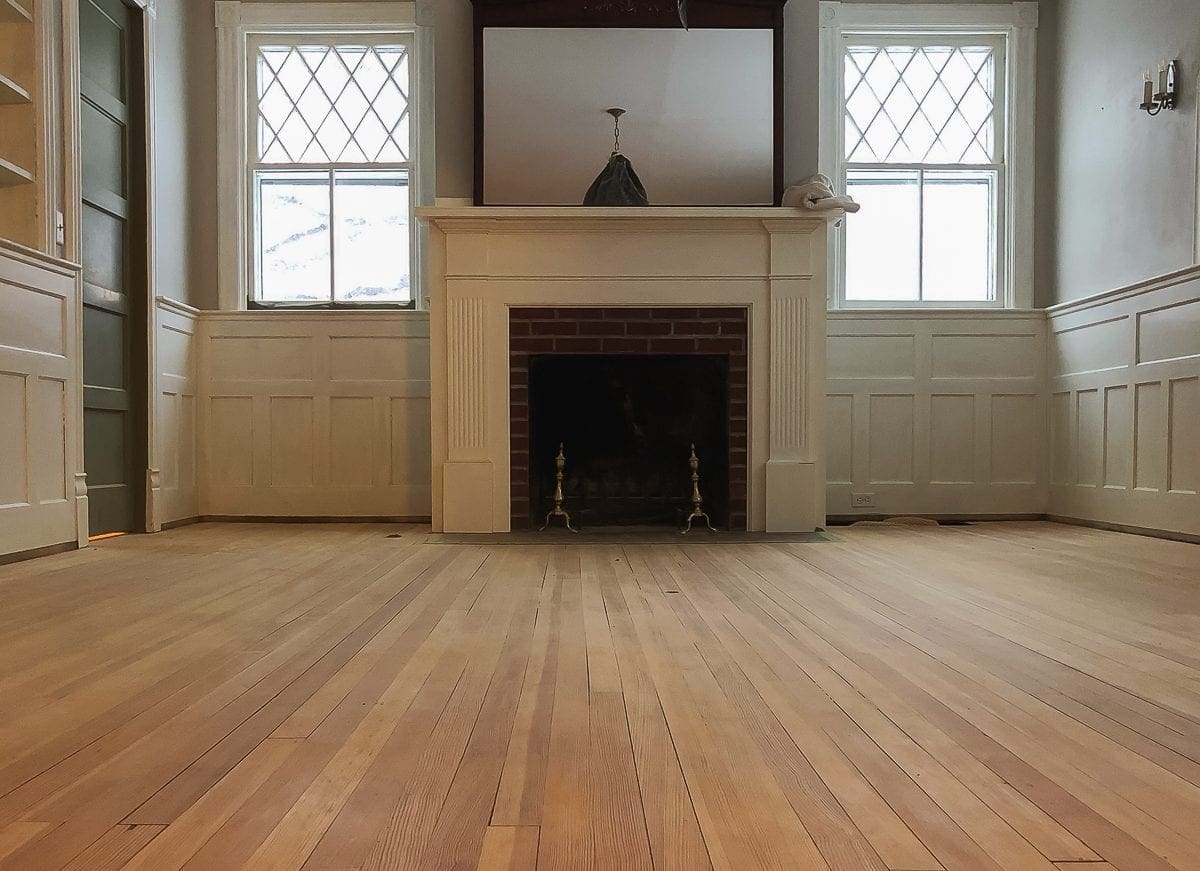
Our plan worked like a charm, but dang, that orbital edger is a backbreaker. By the time I finished, I knew there was no way I was going to use the same method in the laundry room and the hall. No way. Even nearly a week later, my back is still sore from the hunching over, squatting, and scooting. The upside is that the dining room floor looks almost perfect–no blemishes.

Plan B
Since our favorite rental place was closed for the weekend, Andy ran to Home Depot to rent a belt sander, and we were back in business in the laundry room.

We ended up using all three sanding machines. Andy did the first pass with the belt sander, and I did the edges with the Orbital. Then, Andy came back with the U-sand and did the finish sanding. We started with 20-grit sandpaper on both machines, and we worked our way down to 120-grit* without skipping grits. This link explains why all of the sanding steps are important.
Note: If you have never used a sander like this before, start conservatively with higher grit sandpaper such as 36 or even 60. The finish may come right off without resorting to 20-grit paper or lower. The same is true in places where the old finish is already gone completely.
*Rubio Monocoat recommends sanding the floor with 120-grit.
The Details
Sanding the hardwood floors in the hall was the most detail-oriented task of our project. A few weeks ago, we demoed the old floor, and the hardwood underneath was

After the main sanding was finished, it looked 95% better.

Why not 100%? When the vinyl and linoleum were installed, that raised the floor, so it no longer fit under the plinth blocks. To make it fit, the installer undercut the plinth blocks. Now that the new/old floor is gone, there is a gap, and I wanted to remove the old finish underneath. It was unsightly. Also, Rubio Monocoat only adheres to bare wood

I used a combination of hand sanding and these fantastic detail sanding sticks to scrub it all out of there.

There are seven doors in the hall which meant fourteen plinth blocks. In the open areas, sanding the hardwood floors went quickly. However, all of the finish sanding, including doing the corners in all of the rooms with the mouse sander, took a lot of extra of time. All in, we sanded the three spaces (around 700 square feet) in about eleven hours. It was worth it.


Neither Andy nor I found sanding hardwood floors to be a particularly difficult job. That said, it is physically demanding, so we recommend that you stretch often and keep your favorite over-the-counter pain reliever on hand. Fatigue leads to accidents and mistakes, so take breaks to rest and stretch. Andy also recommends this back brace.
Technical Info

WARNING: Always test for lead before you begin any sanding project in an old house. We always keep these lead check swabs handy. If your project is lead-free, move ahead. If it tests positive, STOP and make a plan to keep everyone in your household safe.
Sanding Hardwood Floors DIY Pros
- Sanding hardwood floors as a DIY will save you money, and probably a lot of it. The bulk of the labor cost for refinishing floors is sanding.
- You can schedule your project whenever you like and work at your own pace.
Sanding Hardwood Floors DIY Cons
- Sanding hardwood floors can be backbreaking work. The equipment is heavy, and the act of sanding is physically demanding.
- Inexperience leads to mistakes.
- It is a filthy job. The professionals have all sorts of tricks to keep the dust down, and they clean up when they are finished. As a DIYer, it’s all on you. (I will be vacuuming until I’m dead.)
Managing Dust
Although sanding hardwood floors is a dirty job, there are a few ways to keep the dust down.
- Cover the vents, especially the air intake vents with plastic.
- Close the doors to every room and plug the bottom gap with a towel or plastic.
- Cover hard-to-clean objects such as chandeliers with a plastic bag securely closed at the top.
- If two people are working, one person can operate the sander while the other person follows with a shop vac.
- Attach a shop vac instead of the dust collection bag to the sanding machine. We just bought this HEPA shop vacuum, and we couldn’t be happier.
- After you are finished sanding, wait a few hours (preferably overnight) to let the dust settle. Waiting will reduce the number of times you will need to vacuum.

Machines For Sanding Hardwood Floors
While this is not an exhaustive list, I am including the types of machines that we have used, and a couple of others recommended to us by experienced floor refinishers. I’m listing them from most-aggressive to least-aggressive. I have a friendly relationship with a local rental store just down the road from BHH, and that is where we rent most of the time. However, we have also rented from Home Depot.
Special Note: Many sanding machines are directional, and some have a driver that steers them in one path. That means that you will need to use them in a particular way or direction. Ask your local rental store to explain the machine to you thoroughly, so you will know exactly how to use the sander before you begin your project. This will prevent sanding mistakes.
Belt Sander/Drum Sander
As pictured up above in the library photo, this machine is hardcore. With a low-grit paper, it quickly strips off all types of finish from thick glossy poly to old varnish.
Benefits:
- The belt sander works very quickly.
- Low-grit sandpaper usually lasts for a reasonable amount of time.
Drawbacks:
- Unlike trees, hardwood floors are not a renewable resource. If your floors have been sanded numerous times, this machine might take too much wood away with the finish.
- This machine takes some getting used to. Some belt sanders work on the forward motion, some work by pulling them backward. Lines, bump marks and dips can occur where the belt touches down first. They will show through the finish. Avoid this problem by touching the belt down gently and moving immediately.
- So heavy! Always lift it with a partner.
- Must be used in the direction of the wood grain, or there will be visible scratch marks.
- The sandpaper belts are spendy at around $8 a pop.
- It is difficult to maneuver in small spaces, and it only gets within 5-8 inches of the edges of the room.
Orbital Edger

The orbital edger sander is my favorite, but I have a love/hate relationship with it. In my opinion, it works best for me, but operating it is a real back breaker since the user has to be on their knees or squatting to move it back and forth. I did the entire kitchen and the dining room this way because the upright sanding machines were not doing a good job. Can you say ouch?
Benefits:
- It works like a dream around the edges–so fast!
- The sandpaper discs are super cheap at around $1 each, and they last well.
- This sander offers the most control of any of the power sanders as long as you hold it firmly (see below).
- The edger has a light bulb on the front so you can see where you are going. It’s brilliant!
Drawbacks:
- The edger weighs about 40 lbs! It’s a monster.
- It has to be used while squatting down or on your knees.
- Hold it firmly in your hands, or it will jerk out of your hands and swirl around the room like a beheaded chicken leaving swirl marks and gouges in its wake. Tip: If this ever happens, instead of trying to catch it, unplug it immediately.
- This sander will leave swirl marks if you don’t keep it moving.
- It will not fit under toe-kicks or low shelves. If you need to sand where you have a lot of cabinets, ask the rental company if they have a low-profile version or use a pull scraper. I love this one that attaches to a shop vac. It works perfectly for window restoration projects too.

U-Sand Orbital Floor Sander
I apologize for the crummy photo, but I realized that I only photographed the U-sand in an Instagram Story.

Benefits:
- Multi-directional – No need to go with the wood grain
- Much less aggressive than the belt sander
- While still very heavy, the U-sand has both a handle and lifting bar which makes it easier for two people to lift in and out of a vehicle.
- This machine will sand within 1/2 inch of the edges of the room.
Drawbacks:
- The U-sand works best on a flat surface. If your floor has significant dips or waves, this sander probably won’t cut through the top finish well.
- Less aggressive = slower – That may be fine if you are working on only one room or a delicate surface.
- If you are removing a thick finish, the sandpaper collects corns (clumps of finish) very quickly and needs new pads. Each sandpaper pad costs around $1.25 each X four, and that adds up.
Orbital Palm Sander
You may already have one of these in your DIY tool arsenal. The orbital palm sander is handy for finish work and spot touch-up if you see bumps or swirl marks. It also works well across thresholds where the big machines may not reach well.
Mouse Sander (Detail Sander)
A mouse detail sander is necessary for sanding the last bits out of the corners. The heavy-duty orbital edger cannot reach into those tight spaces and neither can the orbital palm sander. A detail sander with a pointed front is perfect for this job. It also works well to remove swirl marks and small gouges.


Whew! You made it through this entire post. I should offer some kind of reward for that. Would you consider sanding hardwood floors as a DIY project? If you feel like I have left out any crucial information about the sanding process or each type of machine, please leave your thoughts in the comments. I will keep updating this post.
In the meantime, I am working on a post about using Rubio Monocoat while we live here in squalor mid-project.
Also, Part II of thi refinishing hardwood floors as a DIY series, Removing Swirl Marks & Finish Sanding, is now available.
-Stacy
Pin this post for later!
17 Comments
Vanessa
Holy Smokes Stacy! What a huge job.
Stacy
🙂 We are a little overly ambitious sometimes.
Laura
Thanks for sharing! Our money pit house may very well make the DIY decision for us in lieu of hiring a professional.
Stacy
Oh, how I understand! It’s always a money juggle, isn’t it?
Ryan
Thank you for the details. I am excited/dreading the day we refinish our floors. We only had a wax finish and the thin coat I last put down 10 years ago is gone most everywhere. Who would have known. I’ve vacillated between wanting to do the whole project myself to wanting to outsource the sanding but I’ll probably do it myself. We only have the one level (bungalow) but should be able to split it into phase one – living/dining room and phase two – bedrooms and hall.
We have a tiny sun porch with a painted wood floor that I plan to do first as a trial project and will probably sand it by hand. I was thinking I’d try just my orbital sander but I might see about getting one of those orbital edgers, it looks like a beast. When you said in stories that you’d given up on the u-sand and done the whole library with the edger I knew that you’d be feeling it the next day. it sounds like something I’d do too.
Stacy
I understand exactly how you are feeling. Whether to DIY or hire it out is a big decision.
The orbital edger will strip that paint off in no time flat.
Julia at Home on 129 Acres
What a great, informative–and encouraging–post. I have been firmly in the “refinishing floors is not a DIY” camp since our first house. My husband and FIL refinished the floors there, and the floors turned out really terribly (not trying to be mean to either of them). It was so much work and then the results were not something my husband (he acknowledged it) or I were happy with. I think now that we’re a lot more experienced in the DIY department–and I’d make sure I was involved too!–we could likely get a better result. Your post is making me rethink my stance!
Stacy
I understand your feelings. In our last house, we made some mistakes too. The hard part about the sanding errors or coating mistakes is that it is hard to get rid of them without a whole lot of extra work. Your DIY experience will pay off, and knowing what you are trying to avoid is helpful too. I’m glad the post was helpful.
Ragnar
Your info is great! I’d like to add a point or two, just for clarification.
1) AFAIK most drum sanders work both ways (ask the rental company though!) and that speeds up the process a whole lot. All the pros I’ve seen on Youtube and in real life start forward and then immediately do a backward pass in the same line.
2) REALLY important: don’t just lower the drum gently and then start, ALWAYS get moving first and then lower the drum gently once you’re sure the sander is moving properly! This is particularly important when changing direction as many sanders have a single wheel that needs to turn around when you change direction. While it turns around it slows down the machine quite a bit and that can cause gouges too (at some point the wheel is perpendicular to the path of the sander so it really gives the sander a short jerk). I found this particularly problematic when changing from forwards to backwards.
Oh and something on the edger that I learned on Youtube: move it back and forth like the drum sander until all the old finish is gone, only then do one sweeping sideways pass! That helps reduce swirl marks.
Stacy
Thanks for the tips about the edger! Also, I’m glad you added the extra information about how to move the drum sander to avoid marks. I remain confused about the multi-directionality of all drum sanders. The guys at my favorite rental place told me that the one I used worked on the backward pull, and the one Andy rented from Home Depot was the opposite. With such powerful machines, t is hard to imagine using them any other way. I’ll do some more research. It’s possible that I misunderstood.
Eva
Hi! Floors look amazing. Quick question: did you do all the grits with the drum sander and then again with the u-sander? Or did you just use the drum for the lowest grit and then u-sander for the higher ones?
Thanks!
Stacy
Hi Eva, Thank you! 🙂 We used the drum sander with about two of the lowest grits to take off the old poly. Once we could see that the poly was gone, we switched to the U-sand with the same grit that we ended on with the drum sander and worked our way to the finer grits.
Eva
Thanks so much Stacy for replying. I’m literally doing the same thing this week except I had just done the lowest grit with the drum and then moved on to the u sander. I must say that I was very disappointed with what the u sander did… I guess I had this dream that the u sander would get rid of all the unwanted edger and drum marks but it didn’t do that all!
I also read your other post on wetting the wood and using the palm sander to get rid of the swirl marks…did that work pretty well for you? Did you really go through the whole floor and sand those one by one??
Thanks! I’m so happy to have found your blog in the middle of the night! 🙂
Stacy
We were also disappointed with the U-sander. It did not do excellent detail work as we hoped, but it did better than the drum sander. Water popping followed by the palm sander worked great. I did hand sand the entire floor. Eek! The good news is that it’s all a distant memory now, and the floor looks great! 😀 Refinishing hardwood is not easy, but spending time on the details makes all the difference in the outcome.
Good luck with your project. I am sorry you are up in the night, but I’m happy you found the blog too. 😀
Amelia Adams
This is a valuable resource. Bookmarking it for future reference—thanks for putting this together! staining floors