This year, you’ll read a lot from me about improving how our house functions. I am on a quest to fully enjoy living in BHH, a subject I touched on in last week’s post. During January, my focus is on the basement. Today’s post offers some tips and tricks for corralling workshop supplies. For every project, regardless of the location, I follow four simple steps for organizing: Declutter, Categorize, Store, Label.
This post contains affiliate links.
I admit that I get a disproportionate amount of satisfaction organizing areas of the house that few will ever see. When we lived in our house in California, Andy used to tease me about it. The rest of the house could be a complete disaster, but we had the cleanest closets in town. There is just something satisfying about knowing that we aren’t hiding our chaos behind closed doors. There is no trickery here. We keep the mess on full display.
Our basement is one of those “behind closed doors” spaces that feels and functions better when it is clean and neat. BHH doesn’t have a real garage. We do have some outdoor storage, but we keep the humidity and temperature controlled in the basement, making it the best location for tools and supplies.
About five years ago, I got so sick of wasting precious time hunting for tools and supplies that I spent a couple of weeks creating the organizational system that we still use today. My goal was to have a system that,
a) allowed us to shop and home first to save money and resources, and
b) was easy to maintain for everyone.

The problem was that after nearly seven years of serious DIY, the collection of tools and supplies breached the boundaries, and the piles grew. I found myself back in the situation of spending too much time searching for items and not enough time getting things done.

That frustration felt overwhelming, and it led to quite a lot of project paralysis during 2020. Eager to avoid the same scenario in 2021, it made sense to tackle the basement first.
Declutter
Of the four simple steps for organizing, decluttering is my favorite. Every good organization project should start with a thorough purge. The problem with that in a workshop setting is that almost everything could be useful again at some point. Deciding to toss single socks from the laundry and expired meds in the bathroom is easy. Scrap lumber and “that plastic thing that surely must belong to something important,” not so much. It can be difficult to strike a balance, but I try to be pragmatic.
I went through every single bin and drawer and tossed or recycled obvious garbage. In some cases, once I removed the garbage, the items fit well in their bins again.

Categorize
If they didn’t fit, I had to decide whether to use a larger container or if it was necessary to fine-tune the categories. I have two examples.
For some reason, we have amassed a fairly large collection of electrical and plumbing odds and ends. The assortment grows faster than we use it–which is a slippery slope. However, the items never spoil, they can be used in any house we ever own, and they are not taking up valuable shelf space. Rather than attempt to “cull the herd,” I bought a larger lidded bin for each.

Moving items to larger bins is how hoarders get their start, but it makes sense for special circumstances.
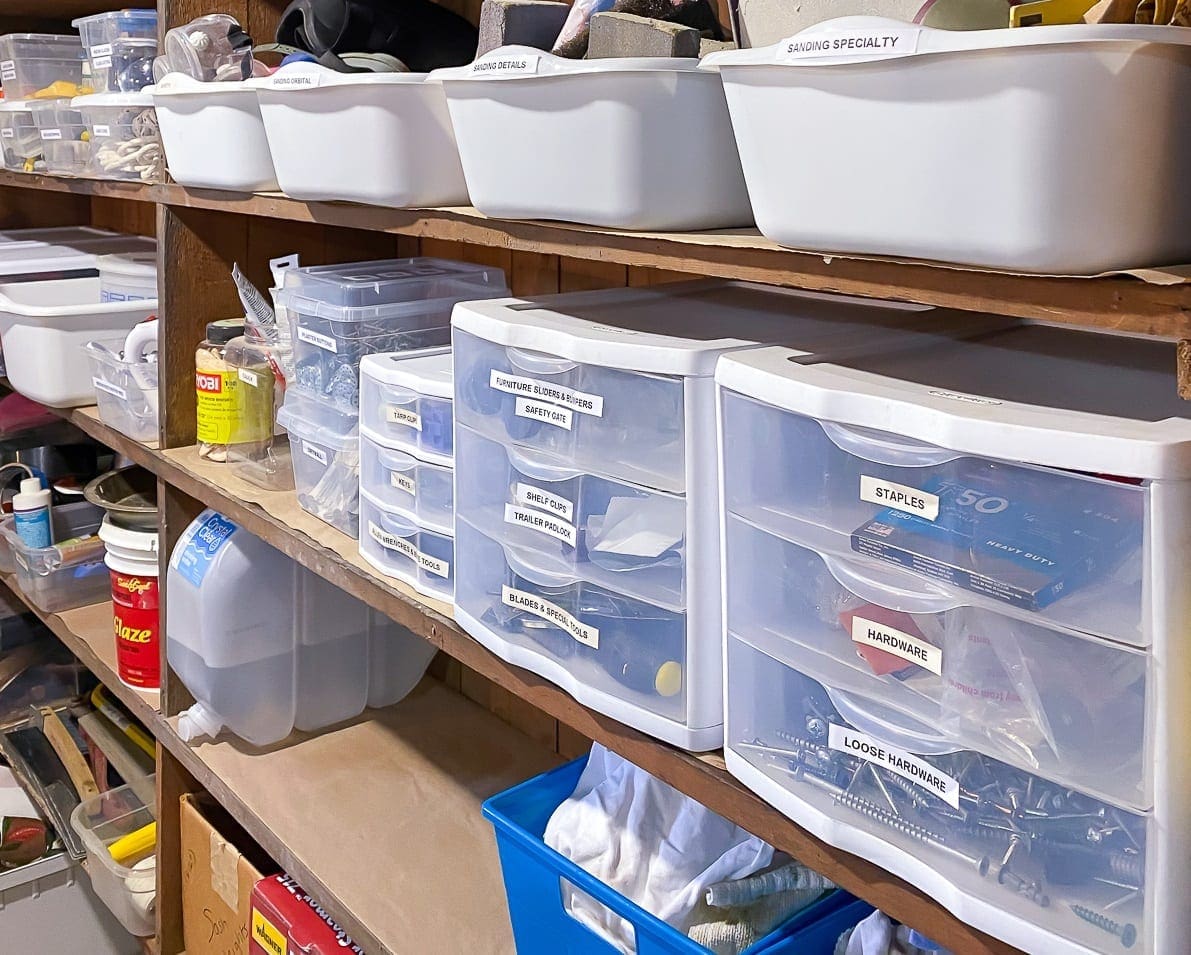
I also ran into a decision to make about sandpaper. My sandpaper bin runneth over. I use sandpaper all the time. Instead of switching to a larger bin, which is harder to dig through, I moved it from one bin to three: Orbital, Mouse (detail), and Specialty (floor sander, belt sander, blocks). Again, that’s a risky, borderline-hoarder solution, but I challenge that I’ll whittle my stash down faster now that those oft-reached-for items are actually reachable.

I categorized everything else in ways that are meaningful to me and the way I work.

Note: It is important to create categories tailored to your workflow. I can explain what works well for me, but it may be very different at your house.
Storage
The simple steps for organizing sometimes feel less simple when it comes to storage. It is easy to get mired in the details and the desire for magazine perfection. I fully admit that I don’t always make everything look as attractive as other home and DIY bloggers. Maybe I am too practical, but it’s a basement. Fancy pre-packaged organizational systems are expensive and often over-engineered. So, I reach for two staples: basic dish tubs and plastic shoeboxes.

I prefer using bins full of like items because I can pull the entire bin off the shelf and cart it around the house or move it to my work table.
The plastic drawer units also come in handy. I often see them at local thrift shops. I am not in love with using plastic, but it’s perfect for these potentially damp and dirty locations.

Label
I admit that the labels are mostly for other people. I already know where everything is. There’s a method to my madness. However, they help my family members find items and put them away correctly. I use a DYMO label maker with white stickers, but the stickers come in colors and clear if you’re fancy like that.

Just like categories, labels should be meaningful to you.
It feels so good to have all of our supplies organized and within reach. This portion of the project is complete, but I have about half of the workshop left to finish. Paint, tools, and wood scraps are next. I am following the same simple steps for organizing and staying focused.
How do you keep your workshop organized? Do you have any tips and tricks to share? I would love to hear them.

12 Comments
SH
So many items; what a great start! I think a sign–BHH Hardware Store–is in order. Condos lack storage, but we have a bin for frequently used tools and one for adhesives (tapes, glues, Command hooks, etc). I also use a bin to collect tools/supplies for any upcoming projects. And we use a 5-shelf wheeled baker’s rack in our storage locker (6ft deep x 3ft wide dog-run style) to avoid the one-huge-pile system.
Even though we don’t have any, still curious to see how you sort and store extra lumber.
Stacy
Thanks! I’ll get to work on that store sign. LOL I love it! What a smart idea to use a rolling rack in your storage unit!
Cathy Cagle
Laughing because I kept thinking of your minimal ‘garage organization’ stash while making inroads into our overflowing massive stash! I could not imagine how you were taking on such big projects with so little stuff. Now I know….. the secret of time.
I’m hoping to make inroads. Hoping and hoping and working on it, bit by bit. Love the very affordable storage dish pans and shoe boxes, might just copy.
thanks!
Stacy
Although this isn’t my first DIY and home renovation house, I do own a lot more supplies and tools now that we have lived here for going on seven years. In the past, I often borrowed or rented tools. Also, my last house was 1700 square feet. This one is 4600. 😀
Cathy Cagle
Hey, totally off subject but I need to strip our natural wood staircase bannister and and spindles so that I can paint them. Any recommendations for a sander or tools tht would help expedite this affordably?
And I meant ‘basement’ in my response to your basement organization post, not garage. duh.
Stacy
I wish I could offer you a magic tool, but it is just going to take time and patience. Citristrip is messy, but it cuts through the finish really well, making it easier to sand. If you use it, wipe off the excess with some steel wool want mineral spirits–messy! If you go this post, I linked some sanding sticks that I love for detail work. They are linked under the heading “Tools For Removing Paint.” There are also inexpensive crevice tools that could come in handy for the grooves. For sanding, if you can fit a palm sander between the balusters, that would be great to use on the flat areas. A mouse sander would work too. For any curves, you’ll have to use some elbow grease, but you can slide the paper back and forth like two people sawing wood operating a two-handle saw. That is what I would do.
Chris
This might be totally irrelevant for you tall people over there, but I also organize by “how common is this task?” and by weight. I keep a stepstool in easy reach regardless, but I organize the most common items at my eye and chest level, the heavy/bulky/less common at waist and below, and the items that are once a year-ish (or like the wallpaper steamer) go above my eye level. I also go seriously for subdividing containers. I find that a “bin” full of small stuff rapidly annoys me and I lose things in them. A couple of sock/silverware type dividers or file folder style tab dividers often make containers work better for me.
I love my label maker! I also use mine to label things like land line phones, so that it is easy to return them to the correct cradle.
Stacy
Great ideas! Keeping often used items at eye level is so important. 🙂 I am not tall either.
Jennifer
I’ve started keeping sandpaper in accordian files. Each divider gets a different grit. Some of them need to double up, depending on how big your accordian file is, but I couldn’t stand flipping through every single one of the little bits and pieces I’d saved up only to figure out that I actually WAS out of 80 grit.
Stacy
This idea is brilliant! Thank you.
Brenda
Good morning, Stacy! Curious if you had to build another shelf or two to fit your expanding collection of tools and supplies or did everything fit on the shelves you built five years ago? Thanks!
Stacy
Hi Brenda, I did buy one additional shelving unit for tools. Otherwise, everything still fits. I try to clear and rearrange rather than expand.