(If you missed day 1 of this project, you will find it here.)
When Andy and I decided to try to repair the plaster cracks in the bedroom walls instead of putting up wallpaper, we did not know how to even start such a project. Both of us have plenty of experience with drywall since we did frequent patching on our house in California during the years we were renovating it. I actually remember working on a wall in our laundry room after the washing machine sprung a leak, and I thought it was such hard work. It seemed like a huge and costly project. I suppose, in all fairness, it might have seemed a little overwhelming since the washing machine broke on Christmas day. We spent most of that day mopping up water and frantically trying to dry out the room before the water seeped under the laminate flooring. Owning BHH really puts DIY life in perspective though. Each project here at BHH is the equivalent of approximately 3-4 California house projects.
In order to familiarize ourselves with plaster, we did some major research. In other words, I typed “repairing plaster cracks” into the google search bar and let the magic happen. One of the first links that popped up was a great video from This Old House. Tom Silva makes things look so easy. Armed with a shopping list, I wandered Lowes for over an hour, searching for everything on the list. Back and forth, I criss-crossed the store reading product labels and comparing prices. I ended up substituting a different adhesive and different plastic caps for the screws. The shopping list from This Old House was a little vague on brands, and I could not find the exact products that were used in the video.
After we had our supplies, we got to work. The process was indeed, quite easy. It just took a very long time.

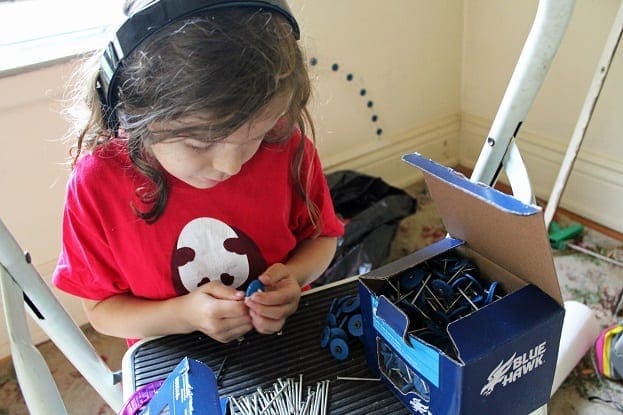
I ended up drilling all of the anchor holes while Andy shopped for beadboard. However, when it came time to put the adhesive in and screw the plaster back to the lathe, Andy and I split up the work. I did the adhesive, and he screwed the drywall screws and caps into the wall. Working together made completing the job much faster.
One of the substitutions we had to make was the plastic caps on the drywall screws. I could not find anything like the caps in the This Old House video. The video’s shopping list did not give them a specific name either. Therefore, I did not know exactly what we were looking for at Lowes. I ended up buying roofing nails with attached plastic caps, but the caps needed to be removed and placed on drywall screws instead. M. was happy to take on that project. Her DIY enthusiasm is hard to match.
By the end of day 2, the cracks were stitched back together, and we dubbed it the Frankenwall.

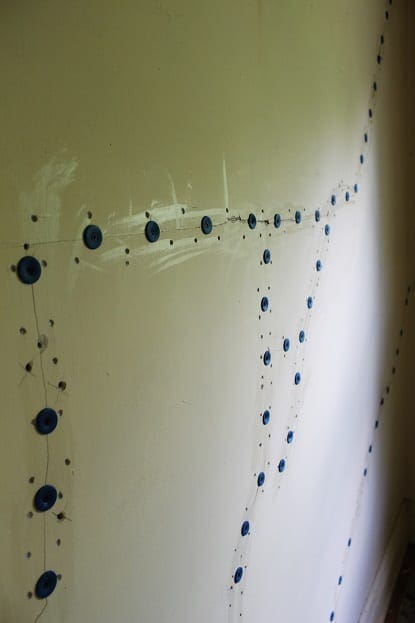
In the photo below, it is really clear just how wide some of the cracks were.

The other walls in the room contained a great number of hairline cracks. We just filled those with wall patch. Only time will tell if our Frankenwall will hold up better than the other walls, but we hope it is a permanent solution for plaster cracks of that severity.
Next up…Day 3: Removal of the the screws and filling all of those holes with wall patch
1 Comment
Jan Elizabeth
You guys are brave, tackling unfamiliar and big jobs like that! 🙂